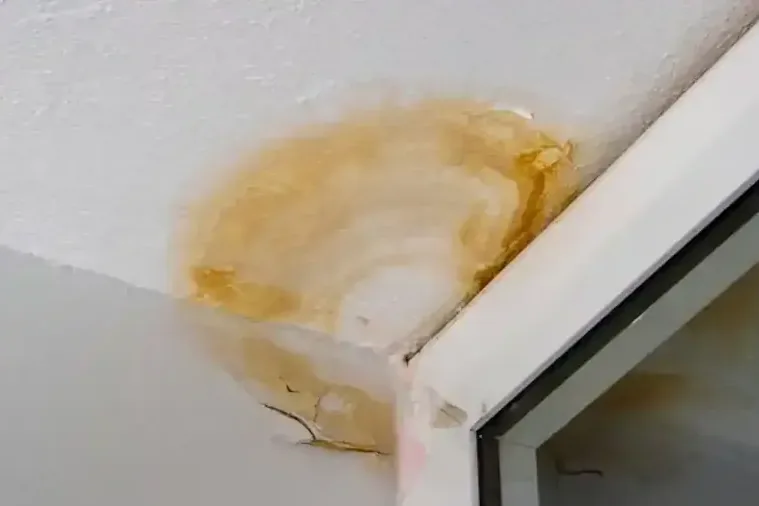
A brown ceiling mark is often noticed from the room below, while the source and the wettest materials remain overhead. In West Linn neighborhoods such as Cedaroak and Hidden Springs, the useful first report describes the room, whether the mark is changing and any dripping or sagging. Safe access above the finish then allows the water path to be traced before the ceiling is repaired.
Key takeaways
- Keep people and furniture away from sagging or visibly unstable ceiling finishes.
- Note whether the stain changes during rain or when an upstairs fixture operates.
- Include the floor and belongings beneath the ceiling in the inspection.
- Coordinate source correction with access to wet overhead layers.
- Obtain a drying handoff before closing openings or repainting.
Observe the stain without disturbing the finish
The shape of a stain can be useful to record, especially where it follows a seam or meets a wall. A photograph from the doorway can show its position relative to the room.
A later photograph from the same safe position makes changes easier to compare.
A swollen or sagging ceiling needs restricted access beneath it. Occupants should avoid pressing the surface, puncturing a bulge or standing underneath to collect water.
The inspection team can determine how the overhead material should be supported or removed after hazards have been assessed.
Any light fitting, fan or electrical device within the affected area should be mentioned before work begins. Water around an electrical component requires qualified evaluation.
Moving possessions out of the room is secondary to keeping people away from an unstable or electrically affected area.
- Describe sagging, cracking or falling pieces in the first report.
- Take a broad photograph that shows the room layout.
- Keep ladders and improvised supports out of the affected space.
Compare the timing with activity above
A leak that appears during rainfall prompts a different source investigation from one noticed after a bath or appliance cycle. The owner can record these observations without repeatedly operating a suspected fixture.
The sequence helps the appropriate repair professional decide where to begin.
Inspection may follow a pipe, an appliance connection or a roof entry route before reaching the stained ceiling. Water can move along framing or another concealed surface on its way down.
Access should therefore be selected from the observed route rather than simply centered on the darkest mark.
The ceiling leak cleanup page explains the material side of this work. Source repair and overhead drying need to be coordinated so an opening provides useful access and the repaired system can be evaluated before the finish is restored.
- Record the last observed dripping without creating another release.
- Describe any bathroom, utility space or roof area above the room.
- Keep the repair findings beside the photographs of the ceiling.
Inspect the room that received the drips
A ceiling problem also creates a floor and contents problem when water reaches the space below. Upholstery, rugs and furniture joints may hold moisture after dripping stops.
The inspection should include the footprint of the release and any splash or spread beyond it.
A bookcase or cabinet directly underneath can shield the floor from view while trapping moisture at its base. Recoverable belongings should be moved through a dry route after conditions are safe.
Their former positions should remain marked on the room sketch so concealed floor areas are checked.
Where liquid has accumulated, water extraction helps expose the condition of the underlying finish. The team should identify whether a rug, its backing and the floor beneath it can be treated together or require separate handling.
- Identify furniture that stood beneath the first drip.
- Check floor edges beside the wall receiving runoff.
- Document water contact with cushions, books and cabinet bottoms.
Create access that answers a specific question
An opening should reveal the material or cavity that needs examination. The crew can explain whether it is intended to inspect insulation, reach wet framing or trace a water path.
Recording that purpose helps the owner understand why access extends beyond a visible stain.
Wet insulation and damaged ceiling board require their own material decisions. An accessible cavity allows the team to evaluate what can remain and what needs removal.
Debris containment and protection of the room below should be arranged before overhead removal begins.
Photographs inside the opening can show layers that will later be hidden again. Captions should identify the room and the direction of the view.
Clear labels are especially helpful when a plumbing contractor and a finish contractor visit at different points in the repair.
- Ask which cavity the proposed opening will expose.
- Record material condition immediately after safe access is established.
- Keep removed material descriptions tied to the ceiling location.
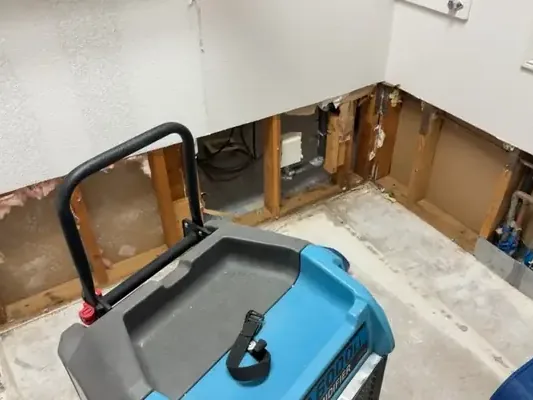
Plan drying around the exposed assembly
Overhead wood, adjoining walls and floor materials below may need different drying access. A useful equipment plan accounts for all affected surfaces while preserving a safe walking route.
The team should explain which part of the assembly each placement is intended to reach.
The structural drying assessment follows retained materials through repeated checks. Monitoring should return to recognizable locations inside the accessible cavity and around the ceiling perimeter.
A change in the drying arrangement should be recorded with the material response that prompted it.
Temporary covers or room restrictions may be needed while an opening remains. Occupants can discuss sleeping arrangements, workspace use and access to belongings with the crew.
The agreed arrangement should keep loose contents away from equipment and avoid obstructing the wet area.
Separate the source repair from the cosmetic repair
A plumber or roofer may complete source correction while interior materials are still being dried. Their work record should describe the defect found and the repair performed.
That description gives the mitigation team a useful checkpoint when watching for further wetting.
Ceiling paint and patching should follow the material handoff. Covering a stain before the assembly has been evaluated can hide the surface needed for later comparison.
The owner should know which materials are ready to close and whether any inspection or trade visit remains outstanding.
Bolton and Sunset are also named West Linn neighborhoods, but the repair instructions for a ceiling depend on the affected building. A contractor estimate should name its actual rooms and openings.
This keeps the scope understandable even when a job passes between several trades.
Prepare a clear final walkthrough
The walkthrough can follow the original water route from the repaired source to the ceiling and then to the floor below. At each point, the owner and crew can examine what was retained, removed or returned.
This helps ensure that a small damaged item beneath furniture is not overlooked.
The file should distinguish completed mitigation from finish work still to come. Photographs of the open cavity, final material readings and the source repair record support that distinction.
The next contractor should be able to identify the required patch without guessing how much ceiling was removed.
An owner can also keep a simple observation note after the room returns to use. Any new drip, changing stain or loosening finish should be reported with its location and timing.
The earlier photographs provide a useful comparison when the repair professional evaluates the change.
Questions
Can a small stain justify checking a larger ceiling area?
The inspection may extend along a concealed water path or adjoining wet material. The technician should explain the findings that support the boundary and record them before an opening is enlarged.
Should furniture beneath a sagging ceiling be rescued immediately?
People should remain clear of the unstable area. Belongings can be assessed and recovered after safe access is established, with photographs documenting their condition before movement when practical.
What information helps the repair contractor locate the source?
The timing of dripping, activity in rooms above and photographs of the affected ceiling provide a useful starting record. Findings from accessible plumbing or roof inspection can then be added to that sequence.
What belongs in the handoff for the painter?
The record should identify completed drying, the area of removed finish and remaining patch work. Cavity photographs and the source correction note give the finish contractor context before surfaces are closed.